root@OpenWrt:/# cat /etc/config/network

config interface 'loopback'
        option device 'lo'
        option proto 'static'
        option ipaddr '127.0.0.1'
        option netmask '255.0.0.0'

config globals 'globals'
        option ula_prefix 'fd47:bf78:16fb::/48'

config device
        option name 'br-lan'
        option type 'bridge'
        list ports 'eth0'

config interface 'lan'
        option device 'br-lan'
        option proto 'static'
        option ipaddr '192.168.100.1'
        option netmask '255.255.255.0'
        option ip6assign '60'

config switch
        option name 'switch0'
        option reset '1'
        option enable_vlan '0'

config interface 'wan'
        option proto 'dhcp'

root@OpenWrt:/# cat /etc/config/wireless

config wifi-device 'radio0'
        option type 'mac80211'
        option path 'platform/10300000.wmac'
        option channel '1'
        option band '2g'
        option htmode 'HT20'
        option disabled '0'

config wifi-iface 'default_radio0'
        option device 'radio0'
        option network 'lan'
        option mode 'ap'
        option ssid 'OpenWrt'
        option encryption 'none'

config wifi-iface
        option mode 'sta'
        option device 'radio0'
        option network 'wan'
        option ssid 'ssidname'
        option encryption 'psk2'
        option key '1234567890'
 sak
sak
OpenCV+WebCAM+Jetson Xavier
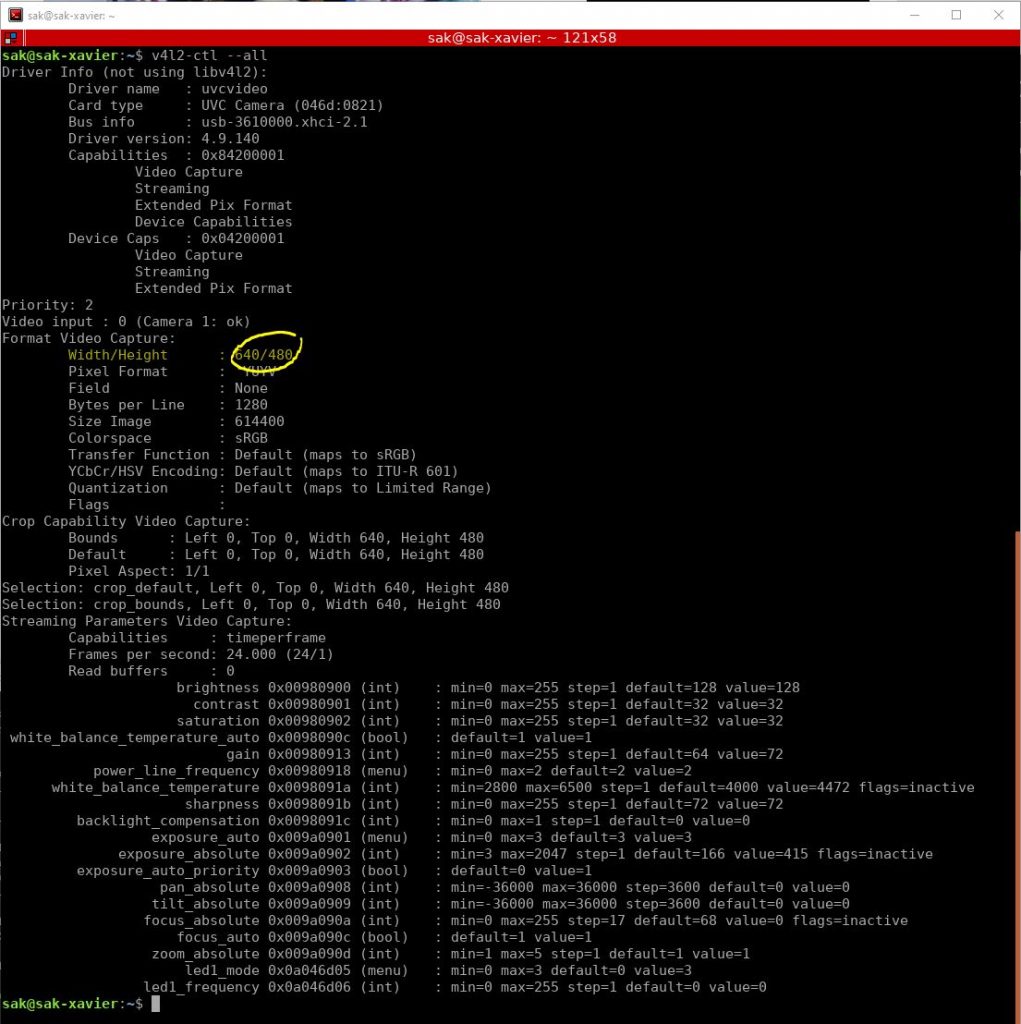
Install v4l-utils with this command:-
sudo apt-get install v4l-utilsVerify WebCAM

Create python program with width and height from v4l2-ctl result.
import cv2
print(cv2.__version__)
width=640
height=480
flip=2
#camSet='nvarguscamerasrc sensor-id=0 ! video/x-raw(memory:NVMM), width=3264, height=2464, framerate=21/1,format=NV12 ! nvvidconv flip-method='+str(flip)+' ! video/x-raw, width='+str(width)+', height='+str(height)+', format=BGRx ! videoconvert ! video/x-raw, format=BGR ! appsink'
camSet ='v4l2src device=/dev/video0 ! video/x-raw,width='+str(width)+',height='+str(height)+',framerate=24/1 ! videoconvert ! appsink'
cam=cv2.VideoCapture(camSet)
while True:
    _, frame = cam.read()
    cv2.imshow('myCam',frame)
    cv2.moveWindow('myCam',0,0)
    if cv2.waitKey(1)==ord('q'):
        break
cam.release()
cv2.destroyAllWindows()
Resurrection of my old DOS Program
Install emscripten
 git clone https://github.com/emscripten-core/emsdk.git
 cd emsdk
 git pull
 ./emsdk install latest
 ./emsdk activate latest
 source ./emsdk_env.sh
Due to some browser such as Chrome and Safari will mute the sound when start. We can fixed the problem by go to emsdk directory, modify “./fastcomp/emscripten/src/shell.html” as shown below:-
        Module.setStatus('Exception thrown, see JavaScript console');
        spinnerElement.style.display = 'none';
        Module.setStatus = function(text) {
          if (text) Module.printErr('[post-exception status] ' + text);
        };
      };
    </script>
    <!-- REF: https://developers.google.com/web/updates/2018/11/web-audio-autoplay -->
    <script type='text/javascript'>
        function resumeAudio() {
          if (typeof Module === 'undefined'
              || typeof Module.SDL2 == 'undefined'
              || typeof Module.SDL2.audioContext == 'undefined')
              return;
          if (Module.SDL2.audioContext.state == 'suspended') {
              Module.SDL2.audioContext.resume();
          }
          if (Module.SDL2.audioContext.state == 'running') {
              document.getElementById('canvas').removeEventListener('click', resumeAudio);
              document.removeEventListener('keydown', resumeAudio);
          }
        }
      document.getElementById('canvas').addEventListener('click', resumeAudio);
      document.addEventListener('keydown', resumeAudio);
    </script>

    {{{ SCRIPT }}}
  </body>
</html>
Check out em-dosbox
git clone https://github.com/dreamlayers/em-dosbox.git
cd em-dosbox
Add “-s FORCE_FILESYSTEM=1” to src/Makefile.am since we also required filesystem support.
EXTRA_DIST = winres.rc dosbox.ico

if EMSCRIPTEN_BUILD
dosbox_LDFLAGS=-s TOTAL_MEMORY=134217728 -s ALLOW_MEMORY_GROWTH=0 -s FORCE_FILESYSTEM=1
CLEANFILES=dosbox.js dosbox.html.mem dosbox.js.orig.js dosbox.js.tmp.js
Configure and build em-dosbox.
cd ~/emsdk
source ./emsdk_env.sh
cd ~/em-dosbox
emconfigure ./configure
make
Put all DOS files inside a directory under em-dosbox/src, in this case “praditww” and start creating dosbox application.
cd ~/em-dosbox/src
./packager.py pradit praditww PRADITWW.EXE
This will create files that will be use to run dosbox with browser ie:- pradit.html and pradit.data. To test it, issue the following command “python -m SimpleHTTPServer” and access this URL “http://localhost:8000/pradit.html”.
Project4Fun Version 2.0
แหล่งรวบรวมสรรพสิ่งที่สนใจไว้ ณ ที่เดียวกัน…